
How to Remove Scuffs and Scratches from Your Car?
Discovering a scuff, scratch, or chip on your car's paint is frustrating. Learning the right approach on how to fix it can significantly lower the level of frustration, but you need to know the difference between a scuff and a scratch.
Despite your best efforts, scuffs or scratches are inevitable. Scuffs are right on the surface of the paint, while scratches have a deeper impact that can affect multiple layers of paint. Scuffs are easy to handle on your own, but deeper scratches are better left to the professionals.
6 Steps for Removing Paint Scuffs from Your Car
These straightforward steps will effectively remove scuff marks from your vehicle's exterior without causing any damage.
1. Examine the extent of the damage.
Gently scratch the damaged surface with your fingernail. If you can see the inner paint, a painting job, and scuff marks removal may be necessary. Deeper scratches require sanding, while lighter marks can be easily removed with an adhesive remover.
2. Wash the area.
Wash the affected area with a car wash product to remove dust and dirt from the surface.
3. Apply a light paint cleaner.
Use a light, less abrasive paint cleaner to remove any old wax and grime. This will allow you to remove any paint that might have been transferred during the scuffing action.
4. Apply cleaner.
Use a clean, microfiber cloth or pad to apply the cleaner to your car while protecting your hands. Avoid using dirty hands or a dirty cloth for cleaner application, as that will make the condition worse and more difficult to remove.
5. Use an adhesive remover.
As long as you check to make sure they are safe to use on paint and coated surfaces, you can use adhesive removers on scuff marks and stains. Turpentine or denatured alcohol are also effective adhesive removers.
6. Apply polishing compound.
If you want to remove scratches caused by sanding or other abrasive methods, apply a polishing compound while using a buffing pad. Then, clean the polished surface area with a clean cloth. This will restore the paint shine and protect the vehicle's finish for a longer run.
Using a Scratch Removal Product for Small Scratches
When it comes to removing scratches from a car, wash the affected area thoroughly and remove dirt and debris. Use a car washing soap and a sponge to work the soap in.
Purchase a scratch-removal product or kit, which usually comes with a buffing pad or a mechanical buffing tool. Apply a quarter-sized dollop of the product to the pad, work it into the scratched area, and wipe away the residue.
Repeat the process 2 to 3 times if needed, and make sure to avoid damaging the clear coat of your car.
Painting to Fix Deep Scratches
Fixing deep scratches on a car can be a little more involved process. First, you should thoroughly wash and dry the affected area to remove any dirt and debris. Sand the area using 2000-grit wet/dry sandpaper in the direction of the scratch. Rinse and dry the area, and do not get any dirt or debris between the sandpaper and the vehicle.
Spray a primer onto the sanded areas, applying a few coats of paint that match the color of your car. Wax the area to seal the paint, applying carnauba wax and buffing it with a buffer pad or microfiber cloth.
Check with your car's manufacturer to ensure the same shade of paint is used.
Remove Scuffs Using Toothpaste
To remove paint scuffs on your vehicle, wash your car thoroughly to get rid of debris. Apply a small amount of whitening toothpaste to a damp microfiber cloth. Rub hard in circular motions until the scuff is removed. For larger scuffs, you can use a buffing attachment for your drill.
We know you care about your car. Here at CleanTools, we have what you need to properly wash, dry, and detail your vehicle.
See Our Collections Here!

How to Recognize the Type of Scratches on Your Car's Paint?
A car's paint job can be greatly impacted by surface scratches, which can make the paint look dull and possibly necessitate repainting. Scratch removal is more difficult than using a machine buff or simple wax, though. Many drivers are let down by newly noticeable scratches a few months after they think their paint is flawless because of recent detailing. While it is not possible to completely erase all scratches, it is possible to lessen their visual impact.
What are the Causes of Paintwork Scratches?
Improper Wash & Dry Techniques
One of the most common ways to scratch the paint on your vehicle is by not using the proper washing and drying techniques. This includes scratches caused by automatic car washes. They may be convenient, but there is no guarantee the company is using properly maintained brushes, which may cause debris to scratch your car.
Accidents and Car Park Dings
Accidents, such as strikes or parking lot accidents, can cause significant damage and scratches. The extent of the damage can vary greatly, making it difficult to determine if the damage can be remedied solely through detailing. If the damage cannot be repaired, it may be necessary to seek professional body repair services.
Intentional Damage
Intentional damage such as scratches on a car door, often referred to as "keying," occurs when someone intentionally vandalizes a vehicle, resulting in scrapes or scratches on the paintwork, with the severity of these scratches varying.
Road Debris and Stone Chips
Road debris, such as sticks and loose gravel, can damage car paint, posing daily dangers to automobile paint jobs. It's advisable to avoid damaging your new car while traveling across the country. Instead, consider using a service to transfer your freshly painted car, ensuring its paint job remains intact.
What Are the Different Layers on a Car's Paintwork?
Primers
The purpose of applying a primer to bare metal panels is to even out the surface and prepare it for the next layer of paint.
Color Coat or Base Coat
A color coat, or base coat, is a basic semi-gloss paint finish. It may have a costly flake or pearlescence found on luxury car models.
Clear Coat
The clear coat is a top layer of paint applied over a colored base coat. It enhances the paint's durability, gloss, and UV resistance.
Coating Layer or Waxing
Any form of coating or wax that you have used to protect the paint of your car from the elements.
Types of Scratches on a Car and How To Fix
Clear Coat Scratch
How To Identify a Clear Coat Scratch
Scratches on the clear coat surface, caused by everyday wear and tear like dusting and washing, appear as swirls, whirls, straight lines, and sometimes white lines.
How To Fix Clear Coat Scratches
Gentle washing and waxing are effective in repairing scratches on cars. Buffing the wax and clearing dirt with a soft cloth can help remove the scratches from clear coat damage.
Base Coat or Color Coat Scratch
How To Identify a Base Coat or Color Coat Scratch
Paint scratches on the surface of an automobile are very annoying and often result from contact with hard objects, abrasive surfaces, or keys.
How To Fix Base Coat or Color Coat Scratches
Paint scratches must be repaired by professionals. Professionals in car painting wash, clear away debris, and sand with a particular grit. The car is given a clear coat to make sure it looks brand new after one to two days of drying.
Primer Coat Scratch or Damage
How To Identify a Primer Coat Scratch or Damage
Accidents and severe abrasions can leave primer scratches that reveal metal layers, making them prone to rust. Since replacing the part or panel is the sole way to remove rust, prompt care is essential.
How To Fix Primer Coat Scratches or Damages
A primer scratch is a process best left for the professionals. The extent and damaged region of the car determine how long it takes.
Steps
- Sandpaper the bigger area.
- Repair any dents.
- Apply a primer and allow it to dry.
- Paint, and then apply a clear coat to cure a priming scratch.
Keep Your Car Looking Pristine
We know how you love to take care of your car—because you love it. That’s why CleanTools loves taking care of you with our wide array of detailing tools and products. So go ahead and fix up those surface scratches, or clean and detail your vehicle with the help of CleanTools.
Explore Our Detailing Products

4 Easy Tips To Prevent Coat Peeling
No one likes to see the clear coat on their car peel or chip, but rest assured Cleantools is here to help. Join us as we go over why your car's clear coat is peeling and tips on how to prevent it from happening.
What Causes Clear Coat Peeling?
Multiple factors cause clear coat peeling on a car, many of which are due to poor maintenance, exposure to environmental elements, and harsh cleaning products.
Snow & Ice
If you live in a climate where there is a lot of snow, you may be at a higher risk of car paint peeling since extended exposure to extreme cold causes paint to become brittle. Not only that, snow and ice alone can scratch the clear coat on your car, sometimes even damaging the actual paint. When roads are icy, salt and gravel are often laid so that there is traction, but are often kicked up, causing coat damage and sometimes rust underneath the car.
UV Rays
On the contrary to snow and ice, strong UV rays from the sun can also cause clear coat damage. Unlike snow and ice, UV rays don’t have to physically touch your car to cause “peeling”—it does it through oxidation.
What’s the Difference Between Oxidation and Peeling?
It’s important to distinguish between oxidation and peeling since they require different forms of treatment and preventative measures. When oxidation occurs, paint loses its shine and becomes dull due to sun exposure and harsh UV rays. Clear coat peeling involves the actual lifting or flaking of the clear coat layer, leaving the underlying paint exposed.
Harsh Cleaning Products
Another common cause for clear coat peeling on your car is the use of harsh chemicals and household cleaners. If you want to wash your car on your own and save the time, hassle, and money on professional car washing, make sure you use the appropriate cleaning products. Many times dish soaps or other household cleaners have high pH levels and are alkaline-rich, making a clear coat deteriorate at a much quicker rate. Use soaps that are specially formulated for the use of cars, and make sure you’re diluting your solution as directed.
4 Easy Tips To Prevent Clear Coat Peeling
Avoid Automatic Car Washes
If you’re serious about keeping your clear coat scratch and peel-free, then you must avoid automatic or drive-through car washes. Even though they offer convenience and seem to get the job done well enough, nylon brushes and high-pressure jets often cause scratches, swirl marks, and paint peeling. There are eco-car washers that clean cars with safe methods like steam cleaning, which gives superior cleaning without the risk of clear coat peeling.
Use Quality Car Cleaning Products
When you’re cleaning your car, harsh cleaning products in your cupboards or under your sink won’t cut it. You’ll need cleaning products specially designed for cars, like the super soft towels from CleanTools. Choosing products made for your car makes a huge difference in how well your car's clear coat holds up.
Regularly Wash and Wax Your Car
You may wash your car often, but are you getting it waxed each time, too? If not, it’s always best to wax your car after you wash it to prevent clear coat peeling since it creates a protective barrier between the outside elements such as bugs, acid rain, and extreme weather conditions. We also recommend using a wax that has UV protection to further protect the appearance of your car.
Use Paint Protections
Similar to wax, there are paint protection films that offer additional protection to your car. Paint protection films act the same way a screen protector does on your phone; they act as a barrier from rocks, ice, and other extreme weather conditions. This type of job should be left up to professionals to ensure that the paint protection film is applied correctly.
How To Fix Car Clear Coat Peeling?
Clean the Impacted Area
Get the car surface super clean with special car cleaning solutions. Make sure you dry and polish the car thoroughly with the best towels for cars.
Inspect the Damage
After cleaning the car, determine what’s causing the paint to chip or peel—it could be due to extreme weather events, the sun’s UV rays, and harsh cleaning chemicals.
Remove the Old Clear Coat
Once you understand why the clear coat is peeling, remove it entirely. This can be done with scouring pads, but you can also take your car to a professional who will have better tools and practices.
Spray Some Fresh Clear Coat
You can replace your car's damaged clear coat by spraying a new one on. They sell clear coat cans at stores, but you can also take your car to professionals for industry-grade clear coat application.
Make Your Car Look Brand-New With CleanToolsThe main contributors to car paint cracking or peeling are extreme weather conditions, the sun’s UV rays, and bad cleaning practices. By understanding the causes of clear coat peeling and having the right resources, you can maintain the beauty and integrity of your car's paint for years to come. At CleanTools, we’re here to help you address any signs of peeling and provide the proper tools to preserve your vehicle's appearance and value.
See All of CleanTools Products

Pressure Washer Best Practices to Clean Your Car
Car professionals and enthusiasts know that a pressure-washer car wash beats out any other standard car cleaning. Drive-through car washes accumulate a heavy amount of dirt, grime, and other contaminants on their bristles which then transfer onto your car. These washes do not properly clean your car and pose risks of damaging the body, coat, and tires. When you wash your car with a pressure washer, you greatly reduce your chances of spending time, energy, and money on potential car repairs.
If you’re wondering how to use a pressure washer for car detailing, rest assured because CleanTools has all the information you need and the products to help make it happen.
Pressure Washing VS Power Washing
Before continuing on power washer best practices, it is a common misconception that power washing and pressure washing are the same thing. These are two different car washing methods. A power washer or jet-spray car wash uses heated water, and a pressure washer uses cold water.
Snow Foaming Your Car
One of the most essential first steps in the car washing process is snow-foaming your car. Snow foam is a pre-wash agent that is typically used with a specialized sprayer called a foam cannon that works by connecting to a pressure washer. Basically, you spray a foamed detergent on the car to remove the first layer of dirt and grime before washing and scrubbing. This is a huge step in car washing because it significantly reduces the risk of swirl marks or scratches on the clear coat of a vehicle.
Follow these basic steps on how to use a pressure washer foam cannon:
- Rinse the car.
- Spray the snow foam onto the car using a foam cannon attached to a pressure washer.
- Let the foam sit on the car for a couple of minutes or however long is recommended to break down the dirt and grime.
- Rinse down the car with water.
- Now you can wash and scrub the car using a car shampoo and a Premium Wash Mitt.
Tip: The best pressure washer for a foam cannon is one that produces at least 1.5 GPM (gallons per minute) and 1100 PSI (pounds per square inch).
Car-Safe Scrubbing Methods
The best way to safely scrub the exterior of your car is with a sponge or wash mitt and a power washer soap solution. CleanTools offers a unique, non-abrasive wool blend wash mitt that gently removes dirt and soil. When you’re scrubbing your car in the washing process, make sure you avoid scrubbing in a circular motion to prevent swirls. It's best practice to rinse the wash mitt in a bucket of clean water after each use to clean off any dirt and grime left on it.
Rinse Your Car With Care
Rinsing your car in the car washing setup is one of the most important and frequent steps. To properly do this, you will need a spot-free rinse for your pressure washer. Rinsing will save you time when washing and help prevent any swirls or scratches when scrubbing. If you’re working in hot weather, make sure you rinse the car even more frequently to avoid water spots. Once you’re done rinsing, dry the car with a super absorbent, scratch-free towel.
Pressure Wash Your Car With CleanTools
Washing your car with a pressure washer is one of the most effective ways to clean your car to avoid paint and coat damage. It’s easy to use and can reach under the car to clean all the nooks and crannies that regular car washes can’t. You don’t have to be a car lover to want your car to look its best and avoid future costly repairs. Give your car an outstanding cleaning using a pressure washer with top-of-the-line products by CleanTools.
See Our Pressure Washer Products

Your Guide on How To Get Rid of Scratches on Car Surfaces
Have you ever gotten into your car and noticed a new scratch appear? You don’t know how it got there and tried to avoid it from happening at every turn. Maintaining your vehicle exterior is a challenge for everyone and you shouldn’t feel alone in what to do.
If you’re unsure as to how to remove scuff marks from your car or want to know ways to prevent it from happening, here’s what you need to know.
Causes of Scratches and Paintwork Damage
Unfortunately, a nick in the paint can happen at any point for many reasons, such as:
Going through car washes.
Car washes are very convenient in being located all around to quickly wash and dry your car, but can cause long-term damage. The large rollers are not soft or absorbent—they collect dirt in the bristles, which can leave scratches and swirls on your car.
Driving too close to bushes and trees.
Sometimes nature can be unruly and if you’re not careful, a stray branch could be the reason for a scratch on top or the side of your car.
Hitting curbs or parking barriers.
This one might be more obvious, but hitting a curb or parking barrier could cause a chip, scratch, or even dent in your car.
Snow, hail, and bad weather.
Hail is a notorious offender in scratching your vehicle. You should also be cautious about removing snow from your car, as the ice scrapers can scratch your paint—we recommend using a de-icer instead.
Gravel or small stones on the road.
Even if all precautions are taken, there is still the possibility of a random rock flying from the road that cracks your windshield or grazes the paint.
Water spots that become water etching.
Water contains trace amounts of minerals like calcium, iron, salt, and other pollutants. When water evaporates from your vehicle’s surface, these contaminants are left behind to bake into the surface. The longer they sit, the more they bond and eat away at the clear coat.
Which Products and Compounds Can Help To Remove Scratches?
Many options in products and compounds help to remove scratches and scraps from your vehicle, but finding the right one can be difficult. Remember, though, that the best scratch remover is to prevent them from happening in the first place—you can do that with the best car cleaning products from CleanTools.
Car Scratch Remover Kit
Kits to remove or repair scratches is the go-to method for most people. They contain everything you need, including scratch removal polish and paste, touch-up paint, and buffers.
Car Scratch Remover Pen
This type of scratch remover is a pen filled with a clear coat of resin which is the same material as the topcoat of a vehicle paint job. When you apply the pen, the resin fills in the gap of the scratch and removes it.
Deep Car Scratch Remover
If the scratch on your car is too deep, particularly down to the bare metal, then you may need to take it in and have someone professionally remove it.
Car Scratch Remover Spray
Sprays that promise to remove scratches will only work if they’re shallow, and aren't as effective when it comes to buffing and getting out deep scratches.
CleanTools Buffing Ball
These Buffing Balls are great for removing oxidation and light scratches from headlights, taillights, and plastic windshields. They are also easy to use with a hex-shaped metal shaft that attaches to any electric or air drill.
Interior Scratch Remover Car
If you have more scratches inside your car than outside, make sure you get the right scratch-removal products since most cars' interior is made of plastic.
Black Car Wax
If you have a black or dark-colored car, you can use black car wax for scratches. Unlike regular wax that fills in the scratch, black wax doesn’t leave any white residue.
How Does a Scratch Remover Compound Work?
A scratch remover compound has very fine abrasives in it to smooth the scratch on the car and blend the coat to give it a smooth-looking finish. These “abrasives” are micro and are similar to what’s found in toothpaste.
Ways to Prevent Your Car from Swirls and Light Scratches
Preventing your car from scrapes and swirls is key to keeping your car looking sleek and brand-new. To do this, keep these tips in mind:
Washing Your Car Properly
With products like Wash Mitt, you can feel confident about washing off dirt and grime with no risk of scratching your vehicle from particles stuck in the Wash Mitt, unlike other rags or wash mitts. After you wash your car, make sure it gets the best dry possible with The Absorber, our super-absorbent and soft drying tool.
Polishing Your Car
Polishing your car greatly benefits in reducing and removing scratches. Not only that, polishing your car:
- Decontaminates the paintwork that cleaners alone can't remove.
- Helps with paint correction and restores fading paint.
- Enhances gloss, shine, and color rejuvenation.
Prevent and Remove Scratches From Your Car With CleanTools
To truly avoid scratches and swirls on your car, it takes special care and attention that includes using the right tools. However, there are many situations where scratches are unavoidable. There could be a random flying rock that grazes your paint or another careless driver who slams their car door into yours when you’re parked. There are many different products and compounds you can try to remove scratches with, but they may not always be effective depending on how deep the cut is. It’s best to maintain your car by properly washing it, not putting it through an automated car wash, and polishing the exterior to reduce the causes of scratches and swirls on your car.
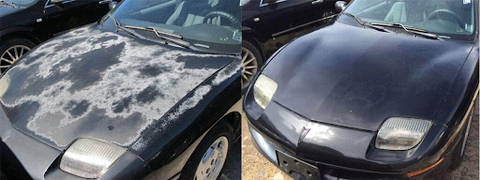
How to Fix a Damaged Clear Coat
Clear coat is your car’s first line of defense against damage. It protects your color coat from wear and tear, and it protects the metal body of your car from being exposed and vulnerable to rust and corrosion. If you don’t maintain your protective layer of clear coat, damage will only spread and require more intensive repairs.
If your clear coat has sustained damage, here’s everything you need to know about repairing it.
What Causes Damage to Clear Coat?
- Physical abrasions: Dings and scratches can take out chips of clear coat—like when a rock flies up from the road and hits your car.
- UV radiation: The sun causes slow, cumulative damage to clear coat over years by heating up layers of paint and causing them to separate.
- Exposure to chemicals: Bugs, tree sap, gasoline, and other substances can break down your clear coat.
- Improper application: Poor application of clear coat will cause it to chip and peel faster than it should.
Items You Need for Clear Coat Repair
- Car wash supplies: soap, wash mitt, and absorbent towels
- Sandpaper or automotive Scotch-Brite
- Isopropyl alcohol
- Automotive clear coat spray paint
- Masking tape
- Buffer & wax
How To Repair Clear Coat on a Car
-
Prep Area
If you haven’t washed the car in a while, you should do so. If it’s fairly clean, just wash the panel you’ll be working on and adjacent areas.
Use masking tape to cover the edges of any adjacent panels that won’t be resprayed with clear coat. Make sure the tape goes inside the panel gap, but don’t let it contact the panel you’re going to repair—otherwise, you may accidentally peel your new clear coat when you remove the tape.
-
Remove Peeling or Damaged Clear Coat
Use fine automotive Scotch-Brite to rub the most damaged areas first. Use light to medium pressure and try to knock off all the peeling flakes. If the color coat is exposed, use very light pressure and focus on the borders.
You can also use fine sandpaper. Start with 1500 grit and go up or down, depending on the hardness of the specific clear coat.
Don’t scrape with a razor blade or anything hard enough to scratch through the clear coat because you can create deep scratches that will require more repair.
-
Create Blend Zones
After removing all peeling clear coat and scuffing the repair area, create a blend zone extending about 3-4 inches in every direction. Use the same Scotch-Brite or 2000-grit wet sandpaper and very light pressure to scuff the blend zone so that the new clear coat has a strong foundation to adhere to. Try to make the transition gradual and tapered toward to old clear coat so you have an easier time blending.
-
Clean Area
Rinse the area with water and then wipe with isopropyl alcohol to make sure every bit of dust and debris is removed. Wait until the surface is completely dry before moving on to the next step.
-
Mask the Area
Use masking sheets, plastic foil, old newspapers, or paper towels to cover any adjacent panels you don’t want to spray over.
For the outer edges of the work area, tape a piece of paper so that it covers the work area and ends somewhere in the blend zone, leaving some of the scuffed area on the outside. Then, fold the paper back so you’re left with a soft edge at the border of the work area. This way, it will be easier to blend in the new and old clear coats when you’re done respraying.
-
Apply Clear Coat
Read the manufacturer’s instructions before applying an automotive clear coat. There should be information about:
- How to mix in the hardener
- How many coats you need to apply
- What flash time to wait before applying the next coat
- How far to keep the spray nozzle from the surface
- How fast to move the can
It’s important to follow the instructions on your specific clear coat, but here are some general instructions to follow.
Shake the can thoroughly for a few minutes, release the hardener, and shake again. Put an appropriate mask or respirator on, and then spray for a couple of seconds to make sure the nozzle works well.
Hold the nozzle about 8 inches from the work area and add a light to medium coat, overlapping your strokes by 30-40%. Make sure you’re going back and forth and release the button before you finish your stroke. Keep your hand moving at all times.
Slow movement is always better than more product. Go lighter rather than heavier to avoid running and dripping.
Spray two to three coats and give them 10 minutes of flash time in between. When you’re done, leave the car overnight and inspect your results the next morning.
-
Blend & Polish
After the clear coat has hardened, remove the masking tape, and be careful not to strip away the new clear coat you just applied.
On the borders of the work area, there will be an obvious line separating the fresh clear coat from the rest of the panel. Use 2000-grit wet sandpaper with light pressure, and be sure to keep the area wet. You can go up to 3000 grit and expand the blend zone slightly outward.
Now, polish the transition. Use a rotary polisher on a low-speed setting, with a medium cut pad and compound. Polish in a direction away from the new clear coat so you don’t peel it back. Hold the machine at an angle so the contact is on the narrow edge of the pad. Using no pressure, make individual passes, lifting and starting over from the repair area. Check your results every few minutes and stop when the transition is barely noticeable up close.
Choose CleanTools for All Your Automotive Repair
Keeping your car clear of things like bugs and bird poop will help prevent damage to your clear coat, and The Absorber is your best friend for effortless cleaning and drying. You can’t totally prevent the breakdown of your clear coat from scratches and UV damage, but when it’s time for cleaning, clear coat repair, and polishing, you can find everything you need with CleanTools.
How to Cut and Buff Properly?
It’s normal for your car to undergo wear and tear over time. But at a certain point, the wear and tear distracts you from its best features. The good news is a simple cut and buff job will restore your car’s former glory in just one day’s work. If you’re wondering what cut and buff is, we’re here to help. A cut and buff kit will help you get rid of scratched, uneven surfaces with an at-home cut and buff job. Plus, you’ll save time and money by doing it yourself.
A Guide on How to Cut and Buff Car Paint
If you’ve never done a cut and buff job on your car, you’re probably wondering how it works. Here’s a step-by-step guide that walks you through how to cut and buff a clear coat so you get the best results.
1. Prep Your Paint Finish
Give the paint finish a good clean before doing any cutting or buffing. This step will remove dirt, stains, and other debris that would bind to the paint, leaving behind pesky scratches and swirls. If your car has any hard-to-clean spots, you can apply an iron remover to dissolve them, leaving you with a smooth finish.
2. Test Spots
An easy way to determine what type of polish and finishing pad you need is to apply a few test spots of polish to your car. Start with a gentle polish and light finishing pad to avoid removing too much of the clear coat. See how the clear coat reacts, then go from there. If the gentle polish doesn’t get the job done, try a slightly stronger one and compare the results.
3. Cut the Paint With a Cutting Compound
A cutting compound repairs the clear coat on a car by removing scratches and oxidation, exposing the fresh paint layer beneath it. You can apply the compound manually with a pad or by using a polishing machine equipped with a wool pad. Removing the top layer of the clear coat prepares the surface for polishing.
4. Polish in Sections From the Hood Down
Once you reach the polishing stage, start with the roof and work your way down. That way, you can see what areas you’ve already covered and what areas are left. If you opt for a power polisher, move it continuously to eliminate lines and swirls most effectively. If you’re a little more old school and prefer to polish by hand, apply a microfiber towel in circular motions to achieve a smooth finish.
5. Protect the Restored Paint With a Wax Coat
Finally, seal the fresh polish with a layer of wax to protect the new paint from damage and give your car that fresh-off-the-lot feel.
Restore Your Car With Our Best-Selling Detailing Products
We’ve helped customers like you care for their cars the right way since 1980. If you want your car to look as good as new again, we have the products you need to make it happen. From a buffing ball to microfiber detailing cloths, you can find it all at CleanTools. Browse our collection today to find the products you need.
Show Our Work Here!

How To Polish Chrome & Other Metals On Your Car
Your car’s wash job isn’t complete without paying some attention to the chrome parts. After all, the chrome glinting in the sun is what catches your eye when you first see a car. The chrome on your rims, door handles, window trim, and other parts needs special maintenance with products designed for it.
The chrome on most modern cars is actually plastic coated with chrome, and you need to be aware of this to avoid damaging it. You don’t want to overdo the polishing or buffing because this will wear away the chrome finish.
Here’s how to polish both plastic and genuine chrome.
Steps to Polish Chrome & Other Metals
For plastic chrome, you’ll need a car chrome cleaner and mild chrome polish. For genuine chrome, you’ll need a chrome cleaner, a higher-grade chrome polish, and a rotary polisher. For both types, you’ll need a wheel brush and an absorbent cloth.
1) Get Rid of Rust
Before you start the cleaning and polishing process, you need to remove any rust from the metal parts of your car. You can use a ball of foil dipped in either water or vinegar to rub away the rust. If this doesn’t work, you can use a piece of steel wool.
2) Choose the Right Metal Polish
Next, select a professional polishing product designed for the metals on your car. There are all-in-one products that can polish chrome, aluminum, nickel, gold, silver, and stainless steel.
The purpose of metal polish isn’t only to make your chrome shine—it also leaves a protective layer that helps prevent scratches and keeps the chrome clean for longer.
3) Clean the Chrome & Metal
Before polishing, clean all dirt and debris from your car’s chrome trim. Using a polishing compound while there is still dirt on the chrome can damage the finish.
Start by hosing down the chrome to get rid of any mud or other gunk.
For the trim on your wheels, apply a chrome cleaner for cars and use a wheel brush to work it in and remove any hard-to-reach dirt.
As you clean your chrome with the chrome cleaner, work in small sections, and don’t let the cleaner dry on the surface. If you encounter stubborn stains, use some steel wool.
When you’re finished, thoroughly rinse off the chrome cleaner. Then dry the chrome using a clean, absorbent cloth. Not forgetting these two steps will guarantee that no cleaner stains or water spots are left behind.
4) Polish the Chrome & Metal
Use the chrome polish that you picked for your car. Remember, a higher-grade polish and a rotary polisher may be needed to shine genuine chrome. Apply the polish and slowly increase the speed of the polisher until the polish is no longer visible.
For plastic chrome, you can work in a milder polish by hand. Simply apply it and use circular motions to work it in. You can use a soft cloth to do this—you don’t want to use abrasive pads, which can damage the chrome.
Lastly, buff all the areas you polished to seal in the wax from the polishing compound. This wax layer will reduce water staining and oxidation, and it reduces the need for cleaning and polishing.
Polish Chrome Like a Pro With CleanTools
Now that you know the best way to clean and polish the chrome on your car, all you need are the right tools. A soft cloth like The Absorber, a buffing ball, and a chrome polish specially designed for your car will make polishing chrome a breeze.
See Our Collections Here!

How to Polish Plastic Trim on Cars?
You know that washing, polishing, and waxing your car is key to keeping it looking brand new, but so is maintaining your car’s plastic trim.
Plastic trim can become damaged, faded, and oxidized, making your car look older. When it’s time for your car care routine, be sure to give your plastic trim some attention.
All you need for a sparkly clean car from top to bottom is a car plastic polish, a foam pad, a rotary polisher, and a few soft cloths.
Here’s how to polish plastic trim.
Steps to Polish Plastic Car Trim
Wash Your Car
Just like when you’re polishing and waxing the rest of your car, you should start by washing your trim for the best results. A quick wash with mild liquid soap and water will work.
1) Tape Around the Trim
Next, use masking tape to cover all areas surrounding the trim, including glass, paint, metal, and any other surfaces. You don’t want your plastic polishing compound or rotary polisher to touch anything other than the trim.
Place the tape as close to the edge of the trim as possible. Make sure it’s thick enough to provide enough space between the trim and the surface you are protecting, in case the rotary polisher pad slips.
2) Install the Pad
You should use a small foam pad attachment that is two or three inches in diameter to polish your trim since trim is typically narrow.
Using a small pad will make the polisher easier to handle and less likely to disturb the masking tape.
3) Prepare the Polisher
Once you’ve attached the foam pad to your rotary polisher, you can apply the polishing compound to the pad. The best plastic polish is one with a light grit that will not damage the trim or leave a chalky finish.
Protect your hands with gloves, and apply a thin layer of the polish onto the foam pad—you don’t need a lot of product.
4) Apply the Polishing Compound
Using a low to medium speed, apply the plastic polishing compound by placing the foam pad on the plastic trim while the rotary polisher is spinning.
You may need to tilt the pad so it only touches the trim and not the other areas of your car’s exterior.
Use light pressure to slowly cover the entire surface of the trim with the compound. Repeat the application twice.
5) Buff the Polish
Use a soft cloth to remove any excess polishing compound from the trim. If you still see scratches or marks, use the rotary polisher to apply more compound.
Once you’ve checked again and you’re happy with how the trim looks, it’s time to buff off the polish. Run a clean foam pad across the trim a few times to do this, using the same technique you used to apply it.
6) Remove the Tape and Wipe
Remove the masking tape and use another clean, soft cloth to wipe down the trim and the surrounding area. This will remove any remaining polishing compound, tape residue, and dust or dirt.
7) Apply a Plastic Restorer
To really make your trim shine and increase the time between cleanings, apply a plastic restorer or “trim restorer.” Plastic restorer also forms a protective layer from UV rays to prevent damage.
FAQ
What Is Plastic Polish?
Plastic polish is a substance that cleans and removes scratches from plastic and similar surfaces, like acrylic. Plastic polish can also be called polishing compound or polishing paste.
Plastic polish is generally gentler and has a lighter grit than polishing compounds intended to smooth out a car’s paint job.
How Does Plastic Polish Work?
The lightest grit plastic polish gently cleans plastic and leaves a nice sheen. A heavier grit plastic polish removes scratches, haziness, and abrasions. The heaviest grit plastic polish, usually in the form of a paste, removes more severe scratches and abrasions.
How Do I Remove Buffing Compound From Plastic?
The best way to avoid residue from plastic polish is to use a light grit polish intended for plastic that won’t leave a chalky finish.
Once you’re done polishing, you should immediately wipe off any excess compound with a clean, soft cloth. If you notice any dried compound residue later, you should first try to remove it with mild soap and water. You can also use a toothbrush or a magic eraser. Wipe the plastic clean with a clean cloth.
If you get paint buffing compound on plastic trim, you can follow these same methods to remove it.
What Are Rubbing Compounds vs. Buffing Compounds For Plastic Polishing?
Rubbing compound has a stronger grit to correct uneven surfaces from scratches. Buffing compound is less abrasive and commonly used to remove superficial streaks left by polishing compound.
When you’re caring for plastic trim, be sure to use products that are designed for plastic surfaces.
Make Your Car Shine With CleanTools
When you have the right tools for the job, car maintenance is a breeze. Whether you’re washing, buffing, or waxing, you always need a soft, high-quality cloth like The Absorber. When you’re polishing, make sure you have the right product for the surface you’re working on and your desired results, and then bust out a buffing ball for that shiny finish.
Show Our Collections Here!

Top Tips for Luxury Car Waxing
If you want to keep your luxury car looking like it belongs in a showroom and protect its value, you should clean and wax it regularly with products specially designed for your car.
To keep your car sparkling clean, you’ll need an appropriate automotive wash, a wool mitt or a soft sponge, an ammonia-free cleaner for your windows, an acid-free, pH-balanced cleaner for your wheels, a dual-action polisher premium car waxes, and polishing compound, and carnauba or polymer wax.
Waxing your car is possibly the most important step, as it seals in all the work you’ve just done washing it, provides a protective layer against dirt and grime, and adds a beautiful, glossy finish.
Here’s how to pick the best high-end wax for your luxury car and the steps to waxing a car.
How to Pick the Right Luxury Car Wax?
Most car wax products consist of carnauba wax, which is derived from Brazilian palm leaves, plus other organic or synthetic compounds. Premium car waxes supplement carnauba wax with other natural waxes and synthetic polymers to give a richer shine than carnauba wax alone. but in order to do so you need proper car waxing techniques. We’ll talk about it later in the article.
Additionally, a car wax made of mostly carnauba wax will have a hard texture and be difficult to use. A label that claims car wax is “100% carnauba wax” is deceptive because products usually contain at most 30% carnauba content in order to make the wax usable.
There are multiple forms of wax, including sprays, pastes, and liquids. Paste waxes require a bit of work but offer the longest-lasting results and are well-suited for luxury cars.
According to dealerships, the best wax for Mercedes-Benz vehicles is a polymer wax, which sets more quickly and tends to leave less of a haze on the surface.
Luxury Car Wax Steps
1. Wash, Rinse, and Dry
Depending on how long it’s been since you gave your car some TLC, you may be able to just do a quick wash with a specialized cleaner and add a top coat of wax. If your car has more stuck-on dirt, you’ll want to wash it thoroughly from top to bottom, leaving the dirtiest areas at the bottom for last. When washing a luxury car, you should work carefully to remove all debris that could create scratches if left behind. After washing, completely rinse your car, including the underside, especially if you need to clear away road salt. Finally, dry your car with a soft, absorbent towel. It’s highly likely that you’ll see swirl marks if you let your car air dry.
2. Use a Clay Bar and Polish
Use a clay bar to buff out stubborn, stuck-on residues after washing. Tree sap is an example of a residue that will be hard to remove with soap alone.
If you haven’t washed your car in a while, you’ll want to polish it to buff out tiny scratches and protect your paint from further damage. Apply two to four coats of a dual-action compound and buff it in with a Buffing Ball. Specially designed for polishing chrome, aluminum, and painted surfaces, the Buffing Ball is made of Italian viscose fibers that won’t overheat or get caked up with product like foam buffers can.
3. Wax
Waxing is the step that will seal in all the work you’ve just done and protect your car from UV rays, chemical and environmental agents, and general dirt and grime. Once you’ve selected a super car wax, all you have to do is work it in with a soft towel. Take your time on each area, and watch your car begin to gleam like new. With another clean towel, buff out the remaining product, and repeat if you’d like.
Here’s a tip: Don’t wax your car in direct sunlight or freezing weather. Luxury car wax works best in cool temperatures, so wax your car in the shade on a hot day or in the garage on a cold one.
Keep Your Luxury Car Looking Brand New With CleanTools
Although a shiny, freshly waxed car will already look stunning, you can take your car to the next level with attention to detail. And there are quick, easy ways to add that extra oomph. Grab a Dash Gear cloth to whisk away dust and lint from your dashboard, navigation screens, and upholstery. Stash The Glosser®, which cleans and waxes in one stroke, in your trunk to eliminate minor dirt spots and extend the life of your wax job. Keep your luxury car looking car show ready between washes and waxes with CleanTools.Show Our Collections Here!

How to Get Rid of Scratches on Your Car?
Picture this: you come home after getting a car wash and step out to admire your squeaky clean vehicle. But then you notice a long scratch on your driver’s side door. What’s that? Where did it come from?
If you find yourself in this situation, the first thing you’ll want to do is see how deep the scratch is and decide if you can remove it yourself. But how should you go about it? Read on for the best tips to remove scratches from your car.
What Products Do You Need to Remove Scratches from Your Car?
There are generally two products you’ll want to consider when trying to get rid of scratches on the car and imperfections on your car. One is Scratch and Swirl Remover, and the other is Rubbing and Polishing Compounds.
The formulations and instructions for Scratch and Swirl Remover products are tailored for repairing blemishes on the finish and small areas of scuffs and scratches.
If you want to address oxidation and dull finish instead, you should opt for a Rubbing and Polishing Compound.
The last item you need is a soft, high-quality towel to buff in these products.
How to Remove Light Scratches & Blemishes From Your Car
The task of getting rid of scratches on the car can be quite stressful depending on how deep the scratch or swirl is. Examples of minor surface blemishes that can be removed with Scratch and Swirl Remover are light marks from fingernails around door handles, light scuffs, or a finish that has lost its gloss. This product can also remove general road film and swirl marks from automatic car washes.
Removing Light Scratches
- Wash and dry your car.
- If you can, mark the scratch with masking tape one inch above and one inch below the scratch to help you apply the product in the right spot.
- Apply a Scratch and Swirl Remover with a soft towel in a back-and-forth motion for 30 seconds with firm pressure.
- Wipe dry with a clean towel and inspect the area to see if the scratch has been removed.
- Reapply the Scratch and Swirl Remover until you achieve your desired results or the scratch becomes clear or invisible
- Repeat the process up to five times
- Apply the Scratch and Swirl Remover to the larger surrounding area to blend in the repair
How to Remove Stubborn Scratches & Blemishes?
If you’ve followed the above steps and the scratch is still there, you can use a Rubbing and Polishing Compound and use a heavier grit to buff it in. Paste compounds are more aggressive than liquid ones, so on new, darker paint finishes you should use a liquid compound. On older, oxidized paint finishes you should use paste compounds.
Removing Deep Scratches
Stone chips, paint transfer, and deeper abrasions may require sanding and polishing or paint repair. For this kind of damage, it is recommended to visit a professional auto repair shop.
How to Buff Car After Removing Scratches?
The process of working a Scratch and Swirl Remover or Rubbing and Polishing Compound into your car removes wax, which is much needed to protect your paint from UV damage, dirt, and more. After polishing or treating scratches, you should clean the area and wait until it’s dry to reapply wax. Gently buff the wax in with a soft towel to restore shine and help protect against future scratches and swirl marks.
Get a Flawless Finish on Your Car
Now that you’re well-versed in car scratch repair, you have everything you need to keep your car’s finish in top-notch condition. You may not be able to avoid scratches in the first place, but you can invest in a quality product and a soft towel to save the day when they do occur. If you want your car to look its absolute best, remember to polish your dash and buff your chrome rims, too.Show Our Collections Here!

Sports Cars vs. Luxury Cars: Which Is the Right Fit for You?
Are you looking into buying a sports or luxury vehicle, but want to make sure you’re making the best choice for your needs and preferences? Maybe you’re not sure what the difference is between the two.
Most car brands offer at least one sports car model, while luxury cars are usually made by luxury brands. The labels “sports” and “luxury” can clue you in on specific features of the cars and help you decide which one is right for you.
Read on to learn about the pros, cons, and differences between sports and luxury cars based on performance, comfort, affordability, and style.
Performance
The focus of sports cars is their engines, and they’re designed to handle well in a variety of road and weather conditions. They’re also known for quick acceleration and speed while maintaining control.
There are luxury sports cars that also provide these features, but luxury cars are usually more focused on offering drivers and passengers a smoother ride so you can’t feel bumps in the road as much.
If you’re looking for high speeds and quick maneuvers, a sports car is the choice for you. If providing a smooth, comfortable ride for all the occupants of your car is more important to you, a luxury car is better suited to these needs
The hybrid class of cars, also known as ‘sporty luxury cars’ are made to offer luxury to passengers and quick pick-up speed and control over the vehicle at the same time.
Comfort
Luxury cars are designed with a focus on comfort. In addition to providing a smooth ride, they can offer more legroom in the front and back seats, heated seats, massaging seats, automatic climate control, computer systems, surround sound, and more.
Since sports cars are focused on performance, they often don’t provide added comfort for passengers, especially for backseat passengers in two-door cars. But this streamlined design is what makes for good pickup and handling.
Affordability
Is a sports car worth it? If you’re wondering, you’ll be glad to know that there is a wide price range for both sports and luxury vehicles, but it’s easier to find a more affordable sports car than it is a luxury car. The average cost of affordable sports cars is about $30,000, while luxury sports cars typically cost more and have a much larger price range between the most affordable and the most expensive cars.
The cost of luxury vehicles also varies widely and depends on what features are most important to you. For example, the MSRP of a 2023 Audi Q7 SUV starts at $59,200 and increases as you add more options or features, while the MSRP of a 2023 Porsche Cayenne GTS SUV starts at $136,360.
It’s also important to consider how expensive a car is to maintain and how well it holds its value. In general, luxury cars are more costly to maintain and depreciate more quickly.
Style
Because of the variety of luxury cars, from sedans to SUVs, luxury cars have more style options than sports cars, but many people buy sports cars specifically for their style.
Sports cars are usually smaller and slimmer, lower to the ground, with less seating capacity, and sleeker trims.
Luxury cars can have more style options inside the vehicle, like leather upholstery, heated seats, and advanced safety features.
Make Your Sports or Luxury Vehicle ShineEven the most stylish sports and luxury cars look best when they’re sparkling clean. When you’re carefully choosing your sport or luxury auto that will best suit your needs and preferences, be sure to invest in quality cleaning materials too, like a premium drying cloth for the body of your car and a streak-free polishing cloth for your dash. Keep your car looking like you just left the dealer with CleanTools.